Fundamental measurements so you can compare frames like-for-like
If you’re thinking of buying a new bike, or a first bike, understanding the key measurements that define your frame is important to ensure you get a machine that fits you and works for the type of riding you intend to do.
And if you’re planning to rent a bike, it’s useful to know your frame’s key measurements, so you can make sure your rental will be comfortable to ride and can be adjusted to fit.
Not all manufacturers measure frame sizes in the same way, so you need to look at a few fundamental measurements to ensure you’re comparing apples with apples.
Read on to find out how to size up your road bike or mountain bike frame to ensure you get the right bike fit. Also check out our comprehensive guide to mountain bike geometry, which tells you how these measures affect handling; even if you’re a roadie, most of the measurements are still as significant.
We’ve also got advice on how to choose the right size frame for road bikes and mountain bikes and specific advice for choosing a women’s bike.
Bike geometry measurements
We’ll tell you below how to measure the key numbers that define your bike. But first, here’s a quick rundown of those numbers:
- Top tube length: the horizontal distance between the centreline of the head tube and seatpost
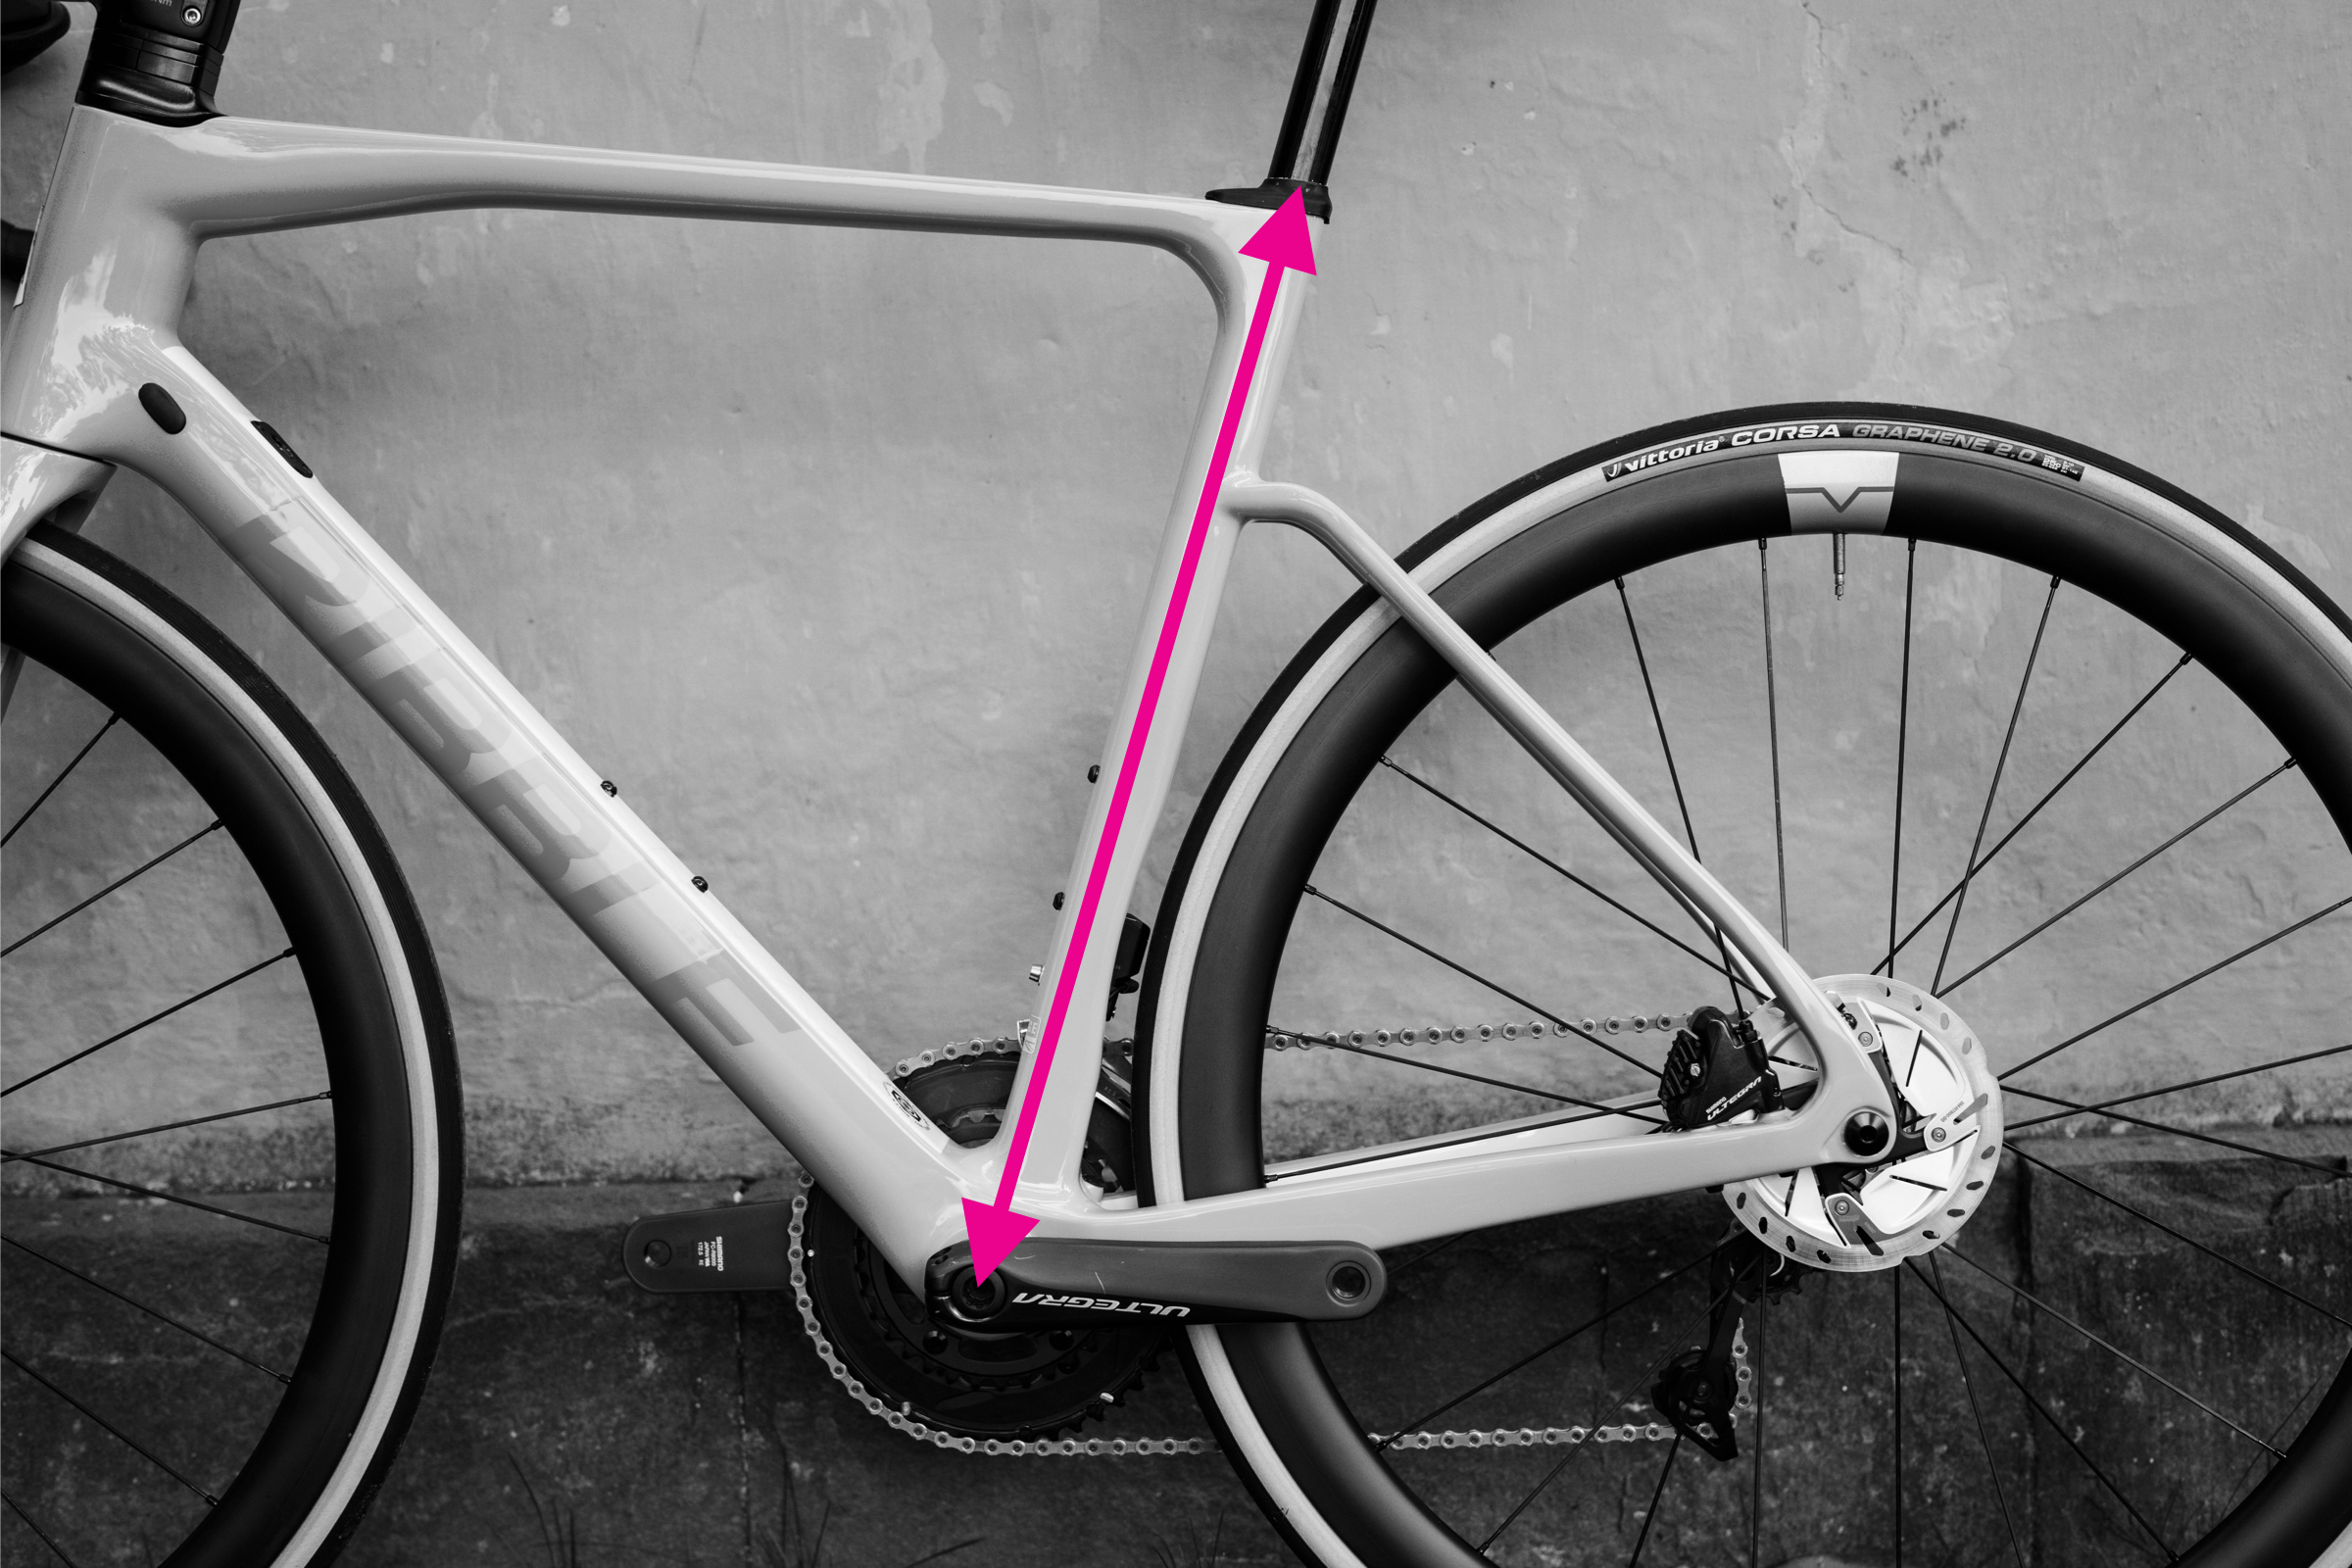
- Seat tube length: the distance between the centre of the bottom bracket and the top of the seat tube
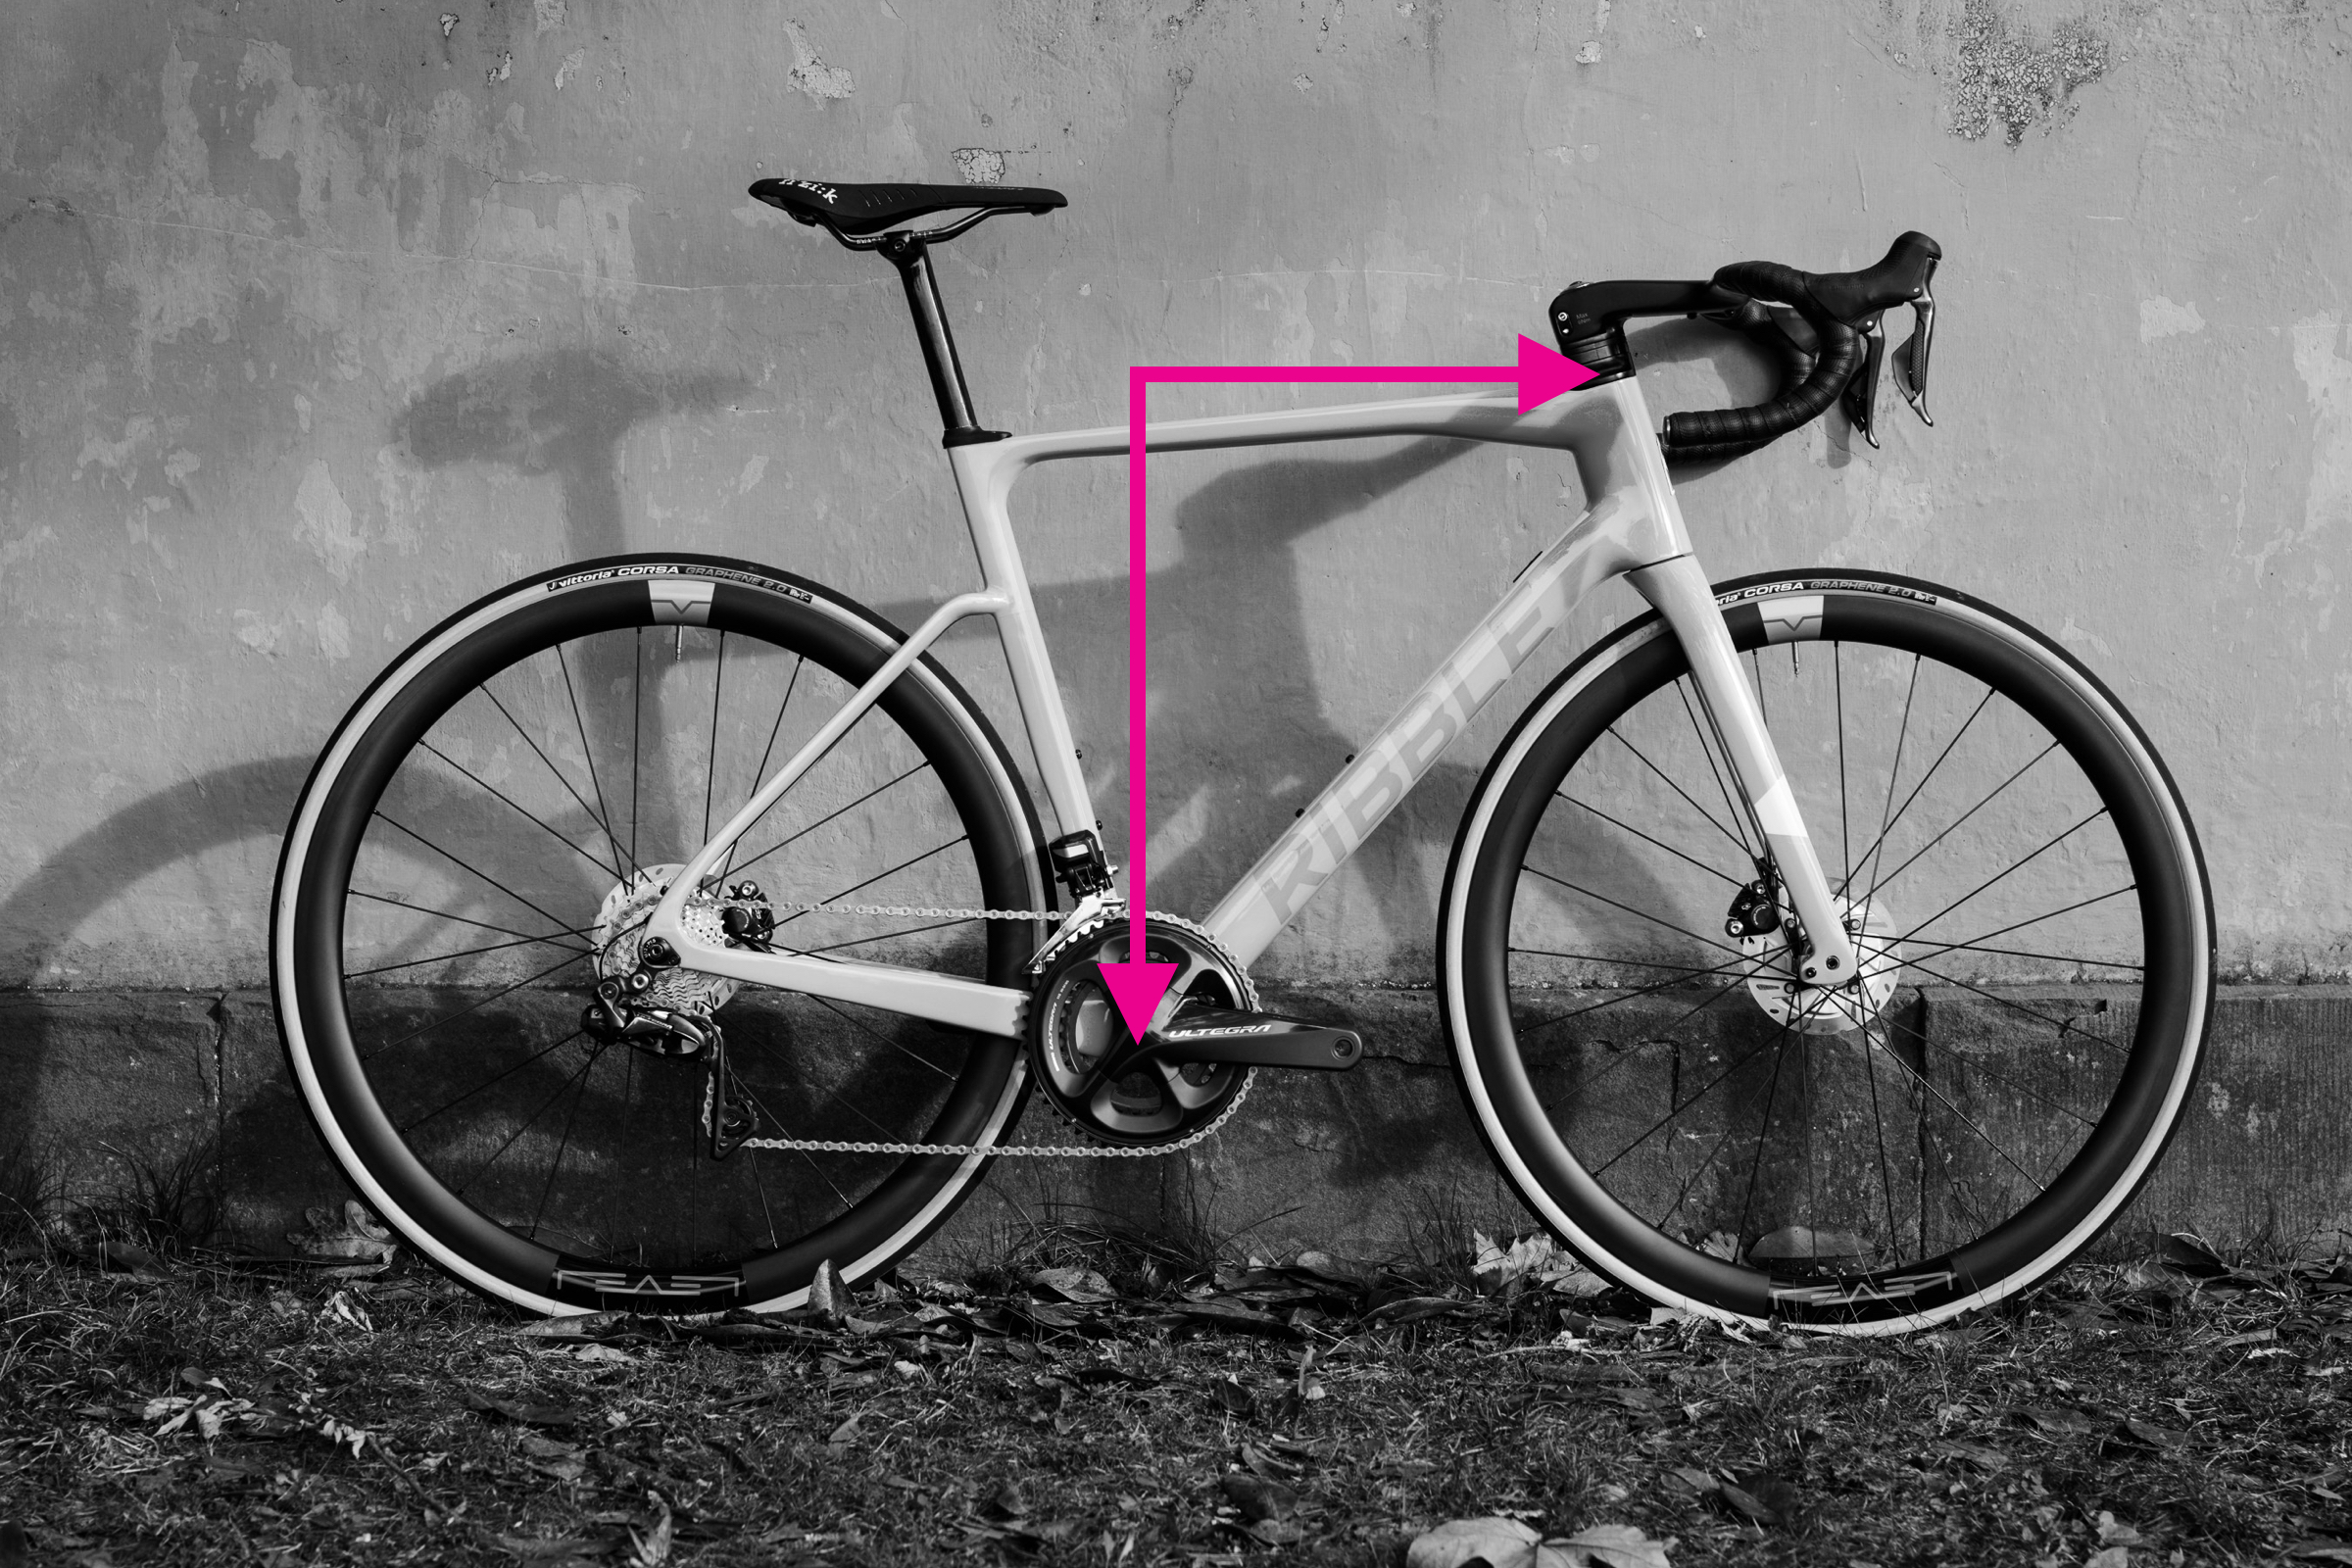
- Reach: the distance between the bottom bracket and the top of the head tube
- Stack: the vertical distance between the bottom bracket and the top of the head tube
- Wheelbase: the distance between the front and rear axles
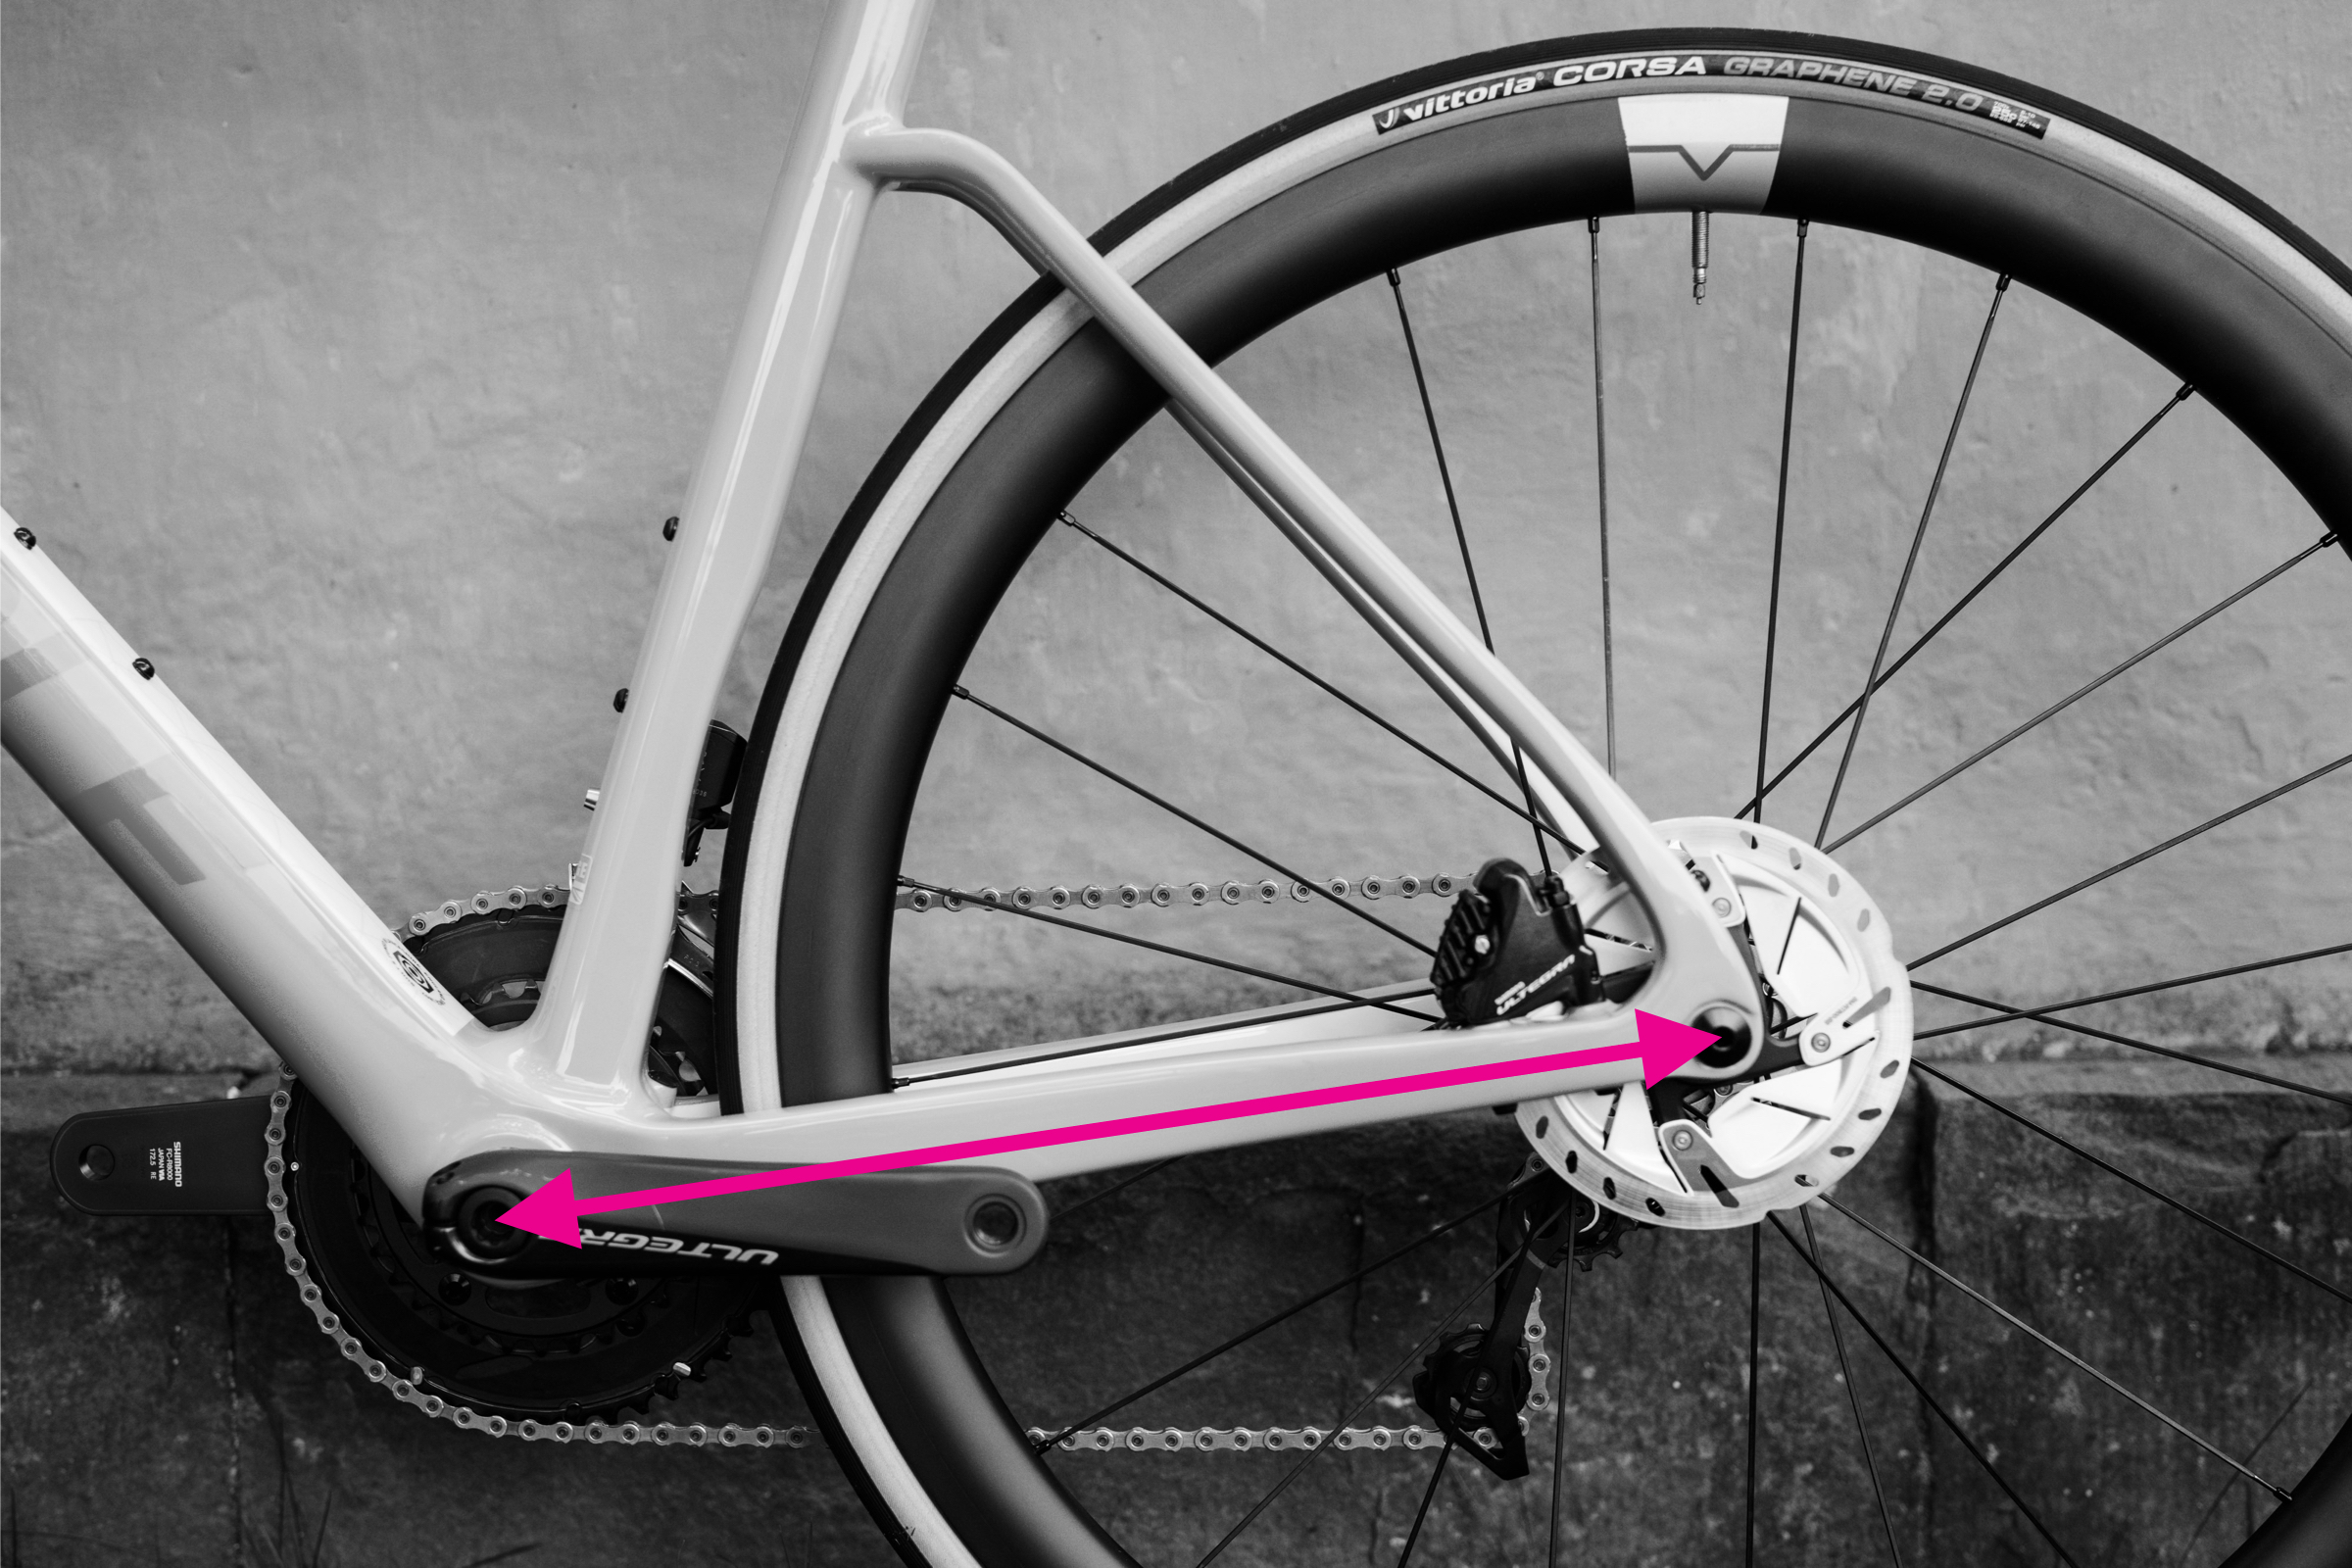
- Chainstay length: the distance between the bottom bracket and rear dropout
- Front centre: the distance from the bottom bracket to the front axle
- Seat tube angle: the angle of the seat tube in relation to the ground
- Head tube angle: the angle of the head tube in relation to the ground
- Bottom bracket drop: the difference between the height of the wheel axle and crank axle
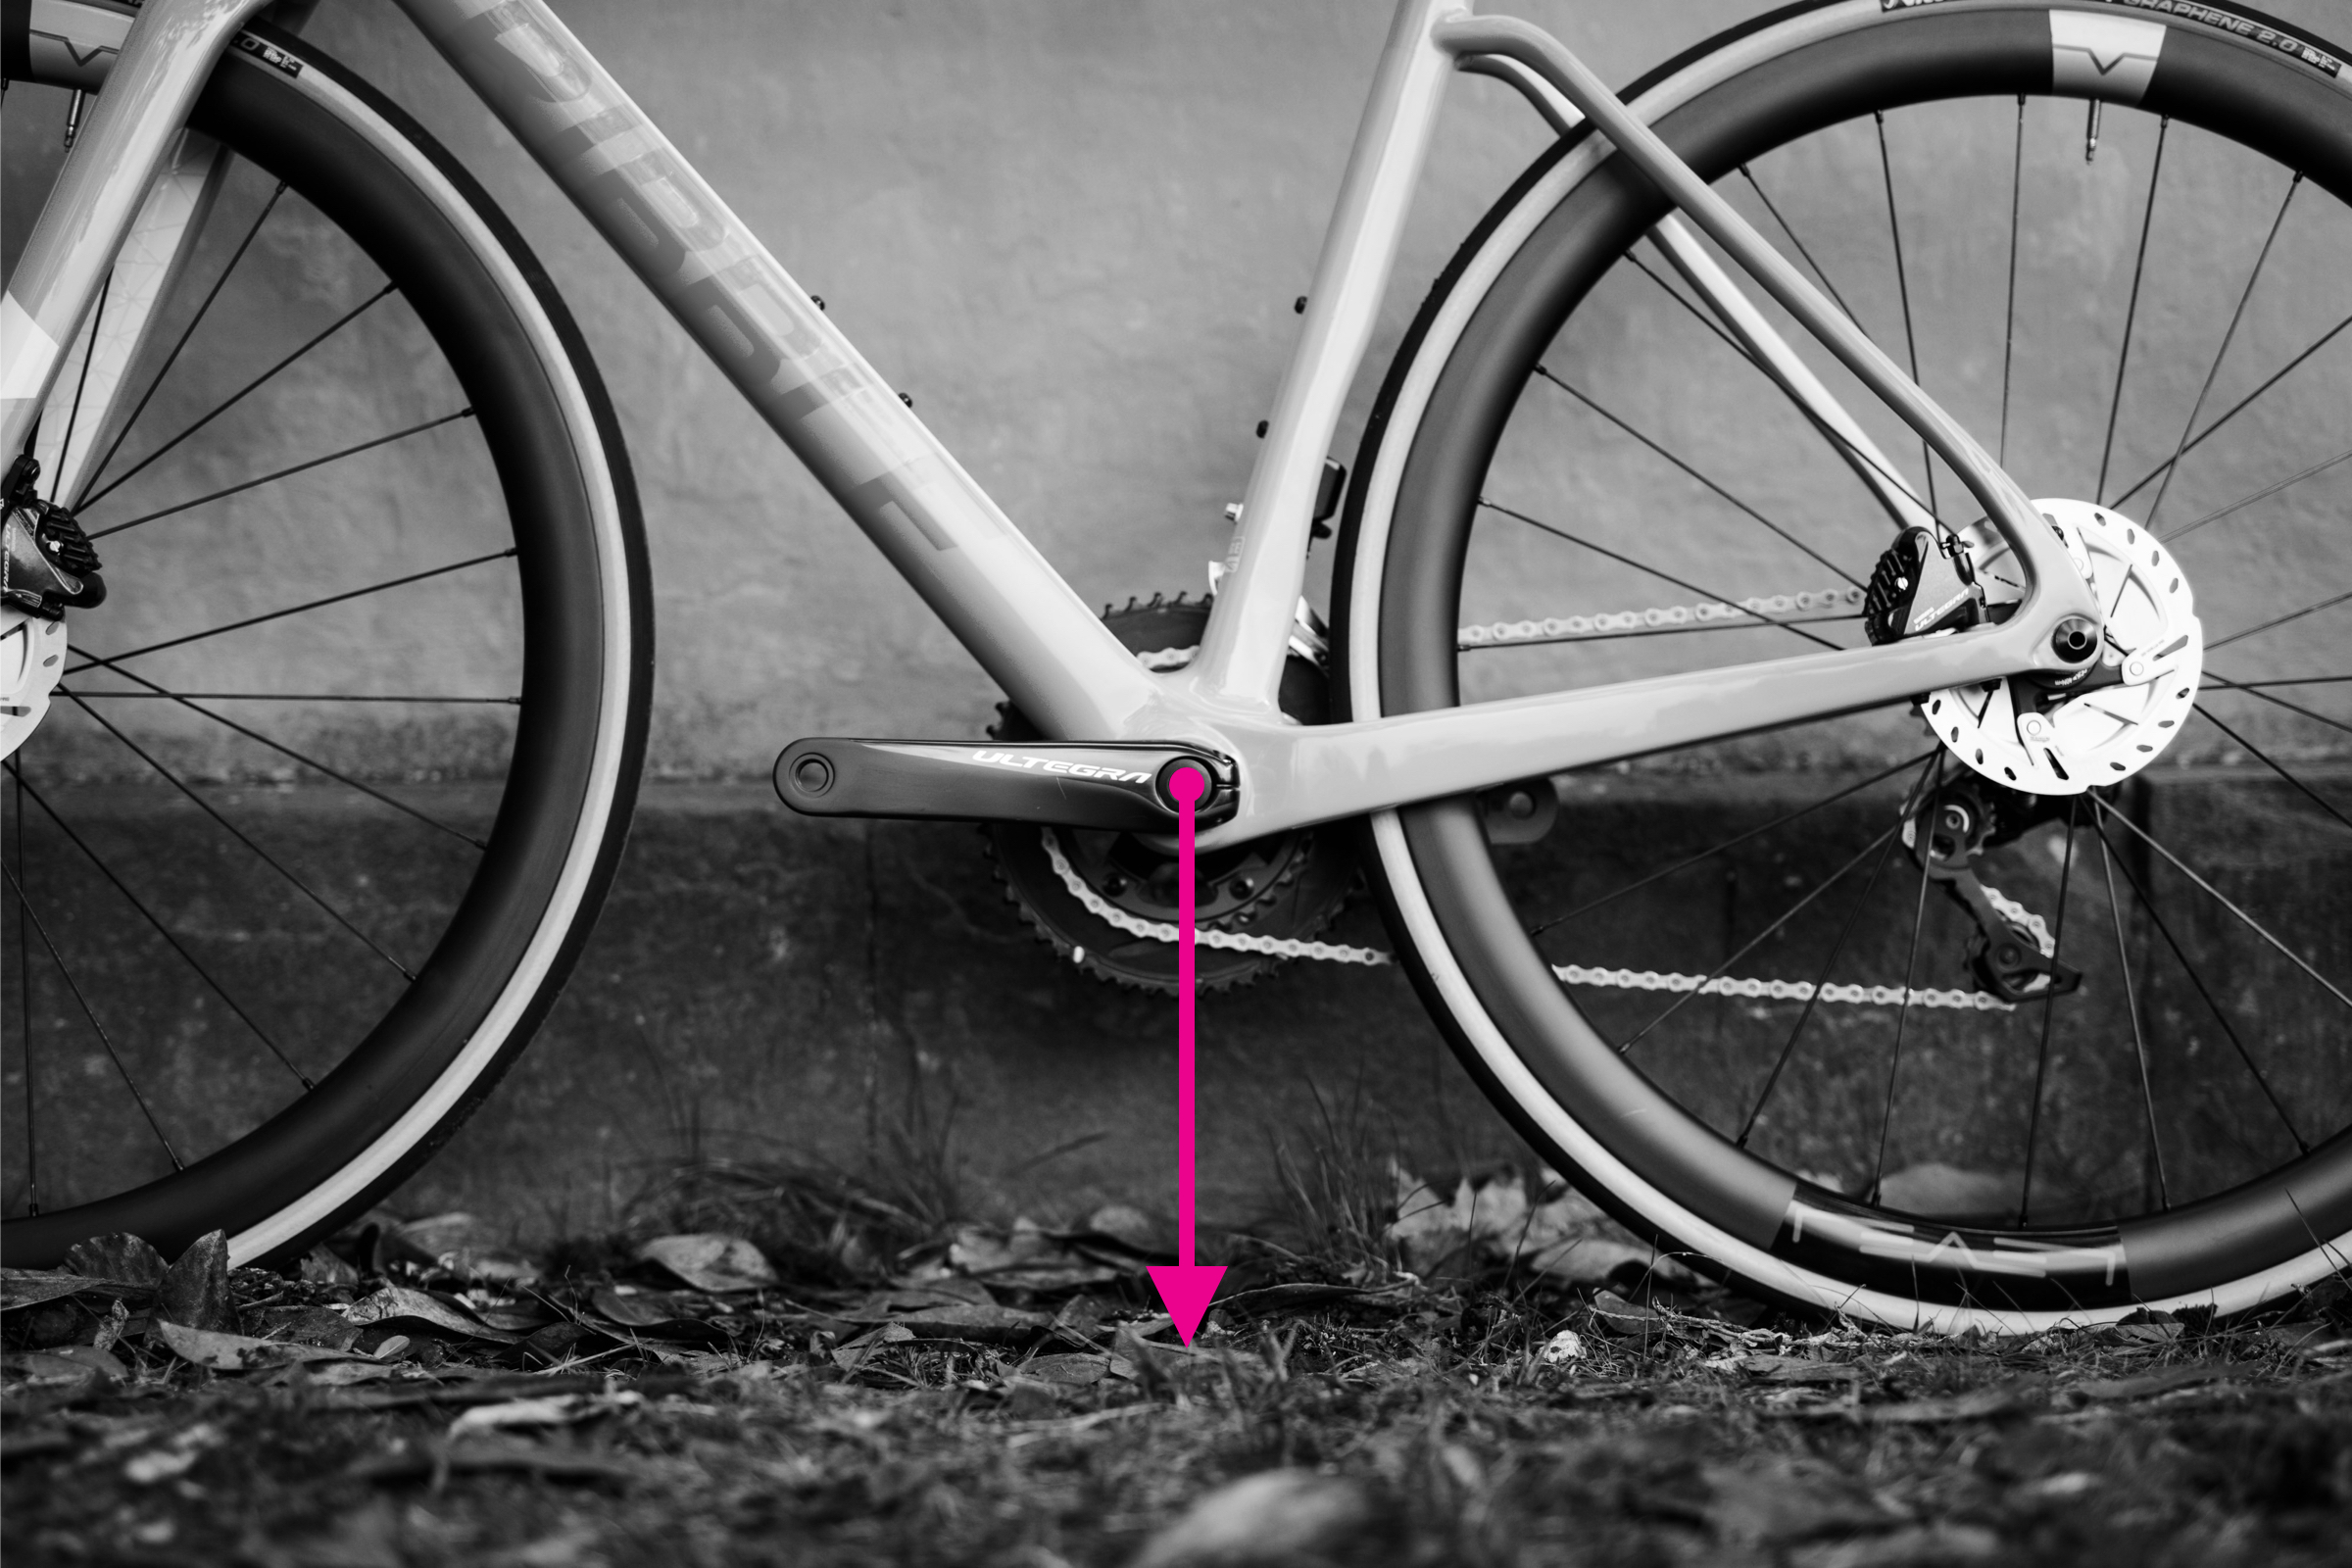
- Bottom bracket height: the distance from the ground to the bottom bracket
What you’ll need to measure a bike frame
To measure a bike frame you will need four tools:
- A tape measure
- A clinometer to measure angles (there are free smartphone apps you can download)
- A long spirit level (or you can use the clinometer app and a straight piece of wood)
- A plumb line (or you can improvise with string and a couple of blobs of Blu Tack)
Most bikes, whether road or mountain, are now measured in metric units, but you may find some manufacturers that still size mountain bikes in inches. Some brands, such as Moots, even mix the two.
We highly recommend you stick to metric units to keep things consistent. If you really must, you can always divide centimetres by 2.54 to switch to inches.
You will usually be able to find a geometry chart for all sizes of a current frameset on a maker’s site. If your bike is still a current model, it’s worth taking a copy of this because it will be more accurate than your measurements and likely a handy reference down the line.
How to measure top tube length
Once, bikes all had horizontal top tubes. Now many bikes’ top tubes will have a slope.
If you look at a bike geometry table, it will usually include the real top tube length. But for a consistent measure, regardless of the top tube angle, you need to measure the horizontal top tube length, called the effective top tube length or virtual top tube in many geo charts.
That’s the horizontal distance between the centreline of the head tube and the centreline of the seatpost. Measuring it correctly will mean using your spirit level or the clinometer app, to ensure your measure is really horizontal.
Many manufacturers size road bikes by top tube length. That’s not true of mountain bikes, where the frame size is usually marked S, M, L, etc. That’s a system used for some road bikes too: Merida’s road bikes go through S, S/M, M/L and L.
Of course, this measurement is up to each brand’s interpretation – Ridley’s size-S frames have a top tube of around 54cm, which is equivalent to many brands’ size-medium frames.
It’s worth noting that not all brands measure virtual top tube length in the same way either.
Colnago, for example, records the horizontal distance from the head tube to a vertical projected up from the top of the seat tube, so it doesn’t take account of the further backward projection of the seatpost and its numbers will come out smaller than other makers’. A 50s Colnago is equivalent to a 54cm top tube.
How to measure seat tube length

Seat tube length is the straight-line distance between the centre of the bottom bracket and the top of the seat tube.
Again, it’s trickier than it sounds: some bikes such as the Trek Madone have a considerable extension of the seat tube above the top tube junction, while others use a seatmast, so it’s difficult to compare with an alternative’s dimensions.
Plus, mountain bikes in particular often have a kink in the seat tube, so you don’t want to follow the line of the tube itself, which will be longer.
Line up your straight edge with the bottom bracket centre and the top of the seat tube and measure along this, if you’re not sure you’re following the right line.
How to measure reach and stack

So we’ve seen that top tube and seat tube lengths are a bit of a minefield if you want to compare frames. For more consistency, most manufacturers will now show reach and stack values for their bikes.
These have the advantage of being independent of frame design and measure the perpendicular distances between two key contact points: the bottom bracket and the top of the head tube.
We’ve published a more detailed explanation of why reach and stack are important here.
In brief, the reach is the horizontal distance between the two. To measure it, you’ll need your spirit level again.
Attach a plumb line to the end of the level. If you’re using Blu Tack, make sure the blob at the end of the string is fairly symmetric and your string hangs down straight, otherwise your measure may be off.
Align the top edge of the level with the centreline of the top of the head tube. Then move the level back and forward until the plumb line intersects with the centre of the bottom bracket spindle. Now just measure the distance between the top of the plumb line and the head tube and you’ve got your reach.
Another option is to push your bike up against a wall, measure the distance to the top of the head tube and the distance to the bottom bracket, then subtract one from the other. You’ll still need to make sure your measurement is horizontal though.
The stack is the vertical distance between the bottom bracket and the top of the head tube. So once you’re set up to record your reach, you should also be able to measure your stack, following the plumb line.
An alternative method is to measure the vertical distance from the ground to the top of your head tube, then measure the height of your bottom bracket from the ground and subtract this.
Both reach and stack are quite fiddly to capture. You’ll probably need a second pair of hands if you use the plumb line method and it’s worth repeating to ensure you’re consistent.
How to measure wheelbase

Your frame’s wheelbase is the distance between the front and rear axles. It’s a key determinant of a frame’s ride quality and will vary with frame size too.
It’s fairly easy to measure, although you need to set the fork straight ahead or your measurement will be incorrect.
Like reach and stack, it’s worth repeating the measurement several times to make sure you get the same number. Accuracy will also be increased if you measure the wheelbase on both sides of the bike and take the average because this will compensate if the fork is not quite straight.
How to measure chainstay length

Chainstay length is one of the two components that make up your wheelbase and, again, contributes significantly to your frame’s handling characteristics. A frame with shorter chainstays will typically feel more lively than one where the stays are longer.
The chainstay length is the straight-line distance between the centre of the bottom bracket axle and the centre of the rear dropout, so it’s fairly easy to measure with a ruler.
How to measure front centre

The other component of the wheelbase is the front centre. That’s the equivalent of the chainstay length but measured from the axle to the front dropout.
Again, it affects handling, as well as toe overlap with the front wheel. It’s not often quoted by bike makers, but BMC, for example, shows it on its geometry charts.
Note that the wheelbase is not the sum of the chainstay length and the front centre, because neither of these is measured horizontally.
How to measure seat tube and head tube angles

The seat tube and head tube angles are two of the most important factors in determining handling, with more upright tube angles typically leading to more nimble handling. Your clinometer app will come in useful here.
If you’ve got a straight seat tube, you can measure the seat tube angle by lining up your smartphone and reading the number from the clinometer app. Make sure your bike is vertical and standing on a horizontal surface for an accurate reading.
If there’s a kink in your seat tube, you’ll need to use a straight edge to follow the line between the bottom bracket shell and the top of the seat tube, then line up the phone with this.
Most newer bikes will have tapered head tubes, so the angle of the front of the head tube will not be the same as the angle of its centreline.
You can get close to the latter by holding your phone at the angle of the centreline, or by using a straight edge to line up with the centres of the top and bottom of the head tube.
If you have straight fork legs, without an angle at their crown, the angle of the legs will be the same as the head tube angle, so you can measure this instead. Again, it’s important to have the bike standing vertically.
You can also measure head tube angle by lining up the clinometer with the steerer extension above the head tube.
How to measure bottom bracket drop

The bottom bracket drop is the difference between the height of the wheel axles and the centreline of the crank axle.
You can measure it by finding the height of the rear axle and the height of the bottom bracket, then subtracting one from the other. It’s another key measurement quoted by bike brands on their geo charts.
How to measure bottom bracket height

Finally, the bottom bracket height is the distance from the ground to the centre of the bottom bracket shell. So that’s quite easy to measure, although be careful to keep your bike straight upright for an accurate reading.
Unlike bottom bracket drop, it will be affected (slightly) by your tyres too, so inflate them to your usual running pressure.
Now you’ve got all the measurements you need to size up your frame, and help with any purchasing decisions in the future, whether that’s a new or second-hand road bike, commuting bike or gravel bike. Keep your numbers somewhere safe though: you don’t want to have to repeat the process.